
How form fields work
Form field blocks add your own questions to checkout: a gift message, a delivery date, a PO number, a “How did you hear about us?” dropdown, or a required terms checkbox. The customer’s answer is saved on the order.
Like every block, form fields need Shopify Plus. Most field types are available on the Free plan; see each page for details.
Where answers are saved
Section titled “Where answers are saved”Each answer is saved as a checkout attribute. Shopify copies checkout attributes to the order when it’s placed.
The attribute’s key (its name) is the block’s Name:
- The Name is cut to its first 28 characters.
- In blocks with more than one field, the second field’s key gets
2added, the third3, and so on. A block named “Delivery info” saves “Delivery info”, “Delivery info 2”, “Delivery info 3”. - To choose your own key instead, see effects below.
The value is what the customer entered:
| Field | Saved value |
|---|---|
| Text field, Text area, Phone | The text as typed |
| Select, Radio | The chosen option |
| Multiple checkboxes | The ticked options, separated by commas |
| Checkbox | true or false |
| Date field, Date picker, Year-month-day | The date as YYYY-MM-DD |
| Timeslot | The slot, such as 10:00 AM - 12:00 PM, under a separate key ending in _time |
See answers on orders
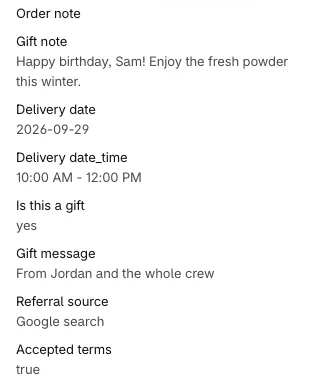
Section titled “See answers on orders”Open the order in Shopify admin. Checkout attributes are listed in the Additional details section.
In emails
Section titled “In emails”Add the answer to notification templates such as Order confirmation (Shopify admin → Settings → Notifications) using the attribute key:
{% if attributes["Gift message"] %} <p>Gift message: {{ attributes["Gift message"] }}</p>{% endif %}In Shopify Flow
Section titled “In Shopify Flow”Flow can read checkout attributes from the order’s custom attributes, so you can tag orders, notify staff, or add notes based on an answer.
In your theme’s cart
Section titled “In your theme’s cart”Some themes list cart attributes on the cart page. Keys that start with an underscore are usually hidden. See data and privacy.
Required fields
Section titled “Required fields”Tick Customer must fill field to proceed in checkout to make a field required. An Error message field appears (default “Required”); customers see it when they try to continue without answering.
Validation
Section titled “Validation”Text fields, text areas, and phone fields can check the answer against a pattern. Tick Apply validation and fill in:
- Custom regex: a regular expression the answer must match.
- Error message: shown when it doesn’t match. Validation only runs when both this and Custom regex are filled in.
- Max length (characters): text areas only.
- Block checkout progress if invalid: stop customers from continuing with an answer that doesn’t match. Without it, the message shows but customers can continue, unless the field is also required.
The pattern matches anywhere in the answer unless you anchor it. Start with ^ and end with $ to check the whole answer.
| To allow | Pattern |
|---|---|
| Only letters, numbers, and spaces | ^[A-Za-z0-9 ]*$ |
| Latin letters including accents, spaces, and hyphens | ^[À-ÿA-Za-z \-]*$ |
| A 5-digit number | ^\d{5}$ |
| A PO number like PO-12345 | ^PO-\d+$ |
Test patterns at regex101.com (choose the JavaScript flavor).
The Year-month-day field has its own Minimum age (years) check. See date fields.
Default values
Section titled “Default values”Checkbox, Multiple checkboxes, and Radio fields can start with an answer selected. Tick Apply default value and enter:
- Checkbox:
trueto start checked. - Multiple checkboxes: the value (or label, if the option has no value) of the one option to tick.
- Radio: the value (or label, if the option has no value) of the option to select.
The default is saved to the order straight away, even if the customer doesn’t touch the field.
Effects
Section titled “Effects”Tick Apply effect when value changes and choose an Effect type to do more with the answer. The choices depend on the field type.
| Effect | What it does | Fields |
|---|---|---|
| Apply value as checkout attribute | Saves the answer under the Attribute key you enter instead of the block Name. | All |
| Apply value as metafield | Also saves the answer as an order metafield with the Metafield key you enter. | All |
| Apply value as metafield (no checkout attribute) | Saves the answer only as a metafield. | All |
| Apply value to order notes | Adds the answer to the order note. | Text field, Text area |
| Match value and apply discount code using metaobject’s metafield | Applies a discount code when the answer matches an entry in a metaobject. | Text field, Text area |
| Apply value to city shipping address field | Also fills in the shipping city with the chosen option. | Select |
| Apply value to shipping address phone field | Also fills in the shipping phone. | Phone |
Save answers as order metafields
Section titled “Save answers as order metafields”Metafields are saved in the checkout_buddy namespace, with the Metafield key you enter (spaces become underscores). For example, key birthdate saves to checkout_buddy.birthdate. Values are saved as text.
To see these metafields on orders, create a metafield definition once in Shopify admin under Settings → Custom data → Orders, with namespace and key checkout_buddy.birthdate and type Single line text.
Prefer Apply value as metafield over the “no checkout attribute” version. The field uses its checkout attribute to remember the answer as the customer moves around checkout; without it, the field can appear empty again after the checkout updates.
Add answers to the order note
Section titled “Add answers to the order note”Apply value to order notes adds the answer as a new line in the order note each time the customer changes it. If a customer edits their answer, the note contains each version. Use the checkout attribute (on every field by default) as the reliable record.
Apply a discount code from a list
Section titled “Apply a discount code from a list”Match value and apply discount code using metaobject’s metafield compares the customer’s answer to a list stored in a metaobject, and applies the matching discount code. For example, customers type a referrer’s name and get that referrer’s code.
-
In Shopify admin, create the discount codes.
-
Under Settings → Custom data → Metaobjects, create a metaobject definition with a JSON field (for example
records), with Storefront access turned on. -
Add an entry whose JSON is a list of objects, such as:
[{ "name": "jamie", "code": "JAMIE10" },{ "name": "alex", "code": "ALEX10" }] -
In the field’s effect settings, enter the Metaobject handle, Metaobject type, and Metaobject field (
records), then the Match value key (name) and Discount code key (code).
Matching ignores capitals but otherwise must be exact. If nothing matches, nothing happens and no message is shown.
Show a field only after another answer
Section titled “Show a field only after another answer”Because every answer is saved as a checkout attribute, other blocks can react to it with the Cart attribute key and Cart attribute key and value display rules. For example, show a “Gift message” field only when a “This is a gift” checkbox is true. See the conditional form fields recipe.
Things to know
Section titled “Things to know”- Place each form block in its own app block with a Fixed block ID. Otherwise another block may take its spot. See which block shows.
- “Disable custom attributes” doesn’t stop form fields. That app block setting only stops Checkout Buddy’s analytics data. Form answers are always saved.
- Translations change saved values. If you translate option labels, a customer checking out in French saves the French label, unless the option has its own value.
- Field labels on Text, Text area, Select, date, and Phone fields are plain text. Checkbox labels support links only.
- Don’t collect sensitive data such as passwords, ID numbers, or card numbers in form fields. Answers are stored as plain text on the order.